



 I just bought this FABULOUS dress at Target on sale for ONLY $11.48 (online for $45) which reminded me of a post DesignMom published a couple weeks ago about this darling designer of children's dresses-
Ses Petites Mains. Their dresses would totally go with my new Issac Mizarahi find. Their prices are really high but what else would you expect from a small designer with a french name?
Like mommy like daughter.
Thursday, April 24


A place to hang your heart.
Wednesday, April 23
 These are just the most charming hangers. Picture a child's white linen dress hanging from their shoulders. You can buy them here.

It's a beautiful day. Don't let it get away.
Tuesday, April 22
 To celebrate earth day I met Brian on his lunchbreak and had a picnic out on the riverfront (well, okay Earth Day might have been incidental) BUT we did throw away our garbage after we were done. I noted that leaving our trash *might* give the hoards of elementary school children with their white plastic bags something to do but Brian was too lily-livered. As far as earth days go I think this one was near the top. The weather was great! Sunny, not too hot, not too cold....maybe a tad breezy but still pretty close to perfect. And the trees
 were GORGEOUSO!! The brightest blossoms I think I've *ever* seen. Brian enjoyed his surprise 'fantasy baseball' tee and I took a lot of photos with our mouths full of Panera....but kept those out of the blog. No one needs to see that.


Fetching florals, feathers and field sparrows for your spring coif.
 After reading an Oh happy day! post. I felt inspired to peruse etsy in search of some lovely hairpieces appropriate for adorning your coif in that spring sunlight. Here are some of my fetching finds. Just click on the picture to be taken directly to
 the selling url. Enjoy:)


Look fashionable while sporting a black eye;)
Monday, April 21
 Step back into the fifties with these *cool* vintage ice bags. Good for headaches, backaches and booboos. Just like grandma used to have....but with better fabric! Look fashionable while sporting a black eye;) You can buy them here!


Pretty things for my car
 When you learn to sew it is both a boon and a burden. Suddenly all those cute things you might have bought without any physical effort other than typing in your credit card number become 70% cheaper if you sew it yourself. Case in point- my previous car seat cover post. After looking at all those yummy fabrics I got jealous and dreamt of having one myself. The price was a little steep for me to sink a chunk of my very limited capital into, so I sifted through the simplicity stacks and found pattern 4636. Whatja think? Lily was so excited to sit in it she barely let me put on the final touches.
 I've been thinking about making one for Molly but I'll have to cut my own pattern for an infant version with hood. Now that I finally got my cigarette lighter fixed, the new seat will go nice with my new XM:) No more five year old Beyonce. Fred, Ethel and Lucy here I come.
Oh one more thing, the simplicity pattern came with a shopping cart cover. I might try that one next. If you have any questions about the pattern just send me a message or comment!
Where the line blurs.......
Sunday, April 20

It looks as though something awful has happened in lily's dollhouse. Talk about make-believe imitating life. The tiny plastic people leave their toys on the floor, throw their blankets off the bed and knock over furniture, too lazy to do anything about the growing chaos. At first sight it looks as though the place has been burglarized in the middle of the night- door kicked in, parents lying unconscience on the floor, tables and chairs overturned. I pointed this out to Brian who got a small kick out of the idea. Today, I turned the house around so that all the clutter lay well hidden. If only real-life were as effortless. 


Some ideas to make your life easier
Saturday, April 19
 This looks great for mommies on the go. You could feed your child without a messy open container. Either in the backseat on a long car ride, a picnic or just for everyday feeding. Whatever. Thought I'd give it a shout out. You can buy it here.
 This looked so useful too! I know my daughter has (perhaps literally) a million stuffed animals. I don't have any room for them and I can't bring myself to give them away so they are constantly encroching on the order of things. This product will take care of two birds with one stone. Soft seating/stuffed animal storage. Comes in different sizes and colors. Buy them here.

Spring Picnic
Friday, April 18
 Today was the warmest day of the year (so far). We didn't have any grand plans so we spent the afternoon eating a picnic lunch in the backyard. Molly enjoyed the outdoors, spellbound by all the sights and sounds she doesn't experience indoors.

We had fried chicken and french fries. Lily of course ate one bite and didn't want anymore, requested an apple, ate five bites then said she was full. Ugh. We finished the lunch by adorning our hair with flowers and throwing the apple to the birds.

Martha Finds: Simple fixes for simple foibles
 Got chocolate milk stains? Try this.
Okay, I didn't mean to get your hopes up if you thought I had some remedy for chocolate milk stains (insidious aren't they). But this is a neat way to cover them up.
Embellish a solid-colored shirt with bright butterflies in flight -- and conceal stains at the same time. Have your child choose the fabric; iron it to one side of fusible webbing. Trace the butterfly template onto the fusible-webbing side, and cut out. Remove paper backing, and iron the shape on top of the stain. Use several sizes and vary fabrics for a decorative effect or to cover multiple stains.
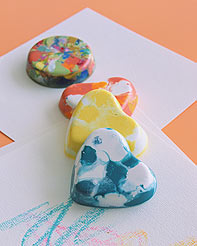 Got crayon crumbles? Try this!
This is such a fantastic idea! Not only do you use the last bits of crayon that were annoying you at the bottom of the crayon box BUT it can also be a fun activity for your kids. Encourage kids to come up with combinations: A blue-and-white blend for drawing the sky, for example, and a mix of reds and oranges for sunsets."
Tools and Materials
Kitchen knife
Old crayons
Mini-cake tins (we used pans with heart- and circle-shaped pockets)
Crayon How-To
1. Parents can use the knife to chop crayons into pea-size pieces, taking care to keep colors separate so kids can combine them as they like.
2. Preheat the oven to 150 degrees while children fill the tin with crayon pieces, arranging them in interesting designs.
3. Bake just until the waxes have melted, 15 to 20 minutes.
4. Remove the shapes after they have cooled. If they stick, place tray in the freezer for an hour, and the crayons will pop out.
 Got a baggy dress? Try this.
I have this problem frequently- A beautiful print (often old navy) dress, no waist. I can usually sew a sash into the dress but if you aren't the seamstress type here's a great idea! A suede hole punched sash. This is great because you there's no fraying and if you buy a sturdier suede material it will hold its shape better. This belt lends itself to variation: Once you get the hang of it, you can even make it without the pattern.
Tools and Materials
1/8 yard of 60-inch-wide fabric|
Hole punch
Yardstick
Erasable fabric marker
Belt How-To
1. Fold fabric in half; place widest part of pattern at the fold. Pin in place with quilting pins, which are long and strong, ideal for heavy fabric like this.
2. Extend the straight lines of pattern to the bottom of the fabric with an erasable fabric marker and yardstick.
3. Cut out the belt. With the hole punch, perforate the edges, positioning holes 1/4 inch apart and 1/4 inch in from the edge.
4. Wrap belt around waist, and tie in back.
 Got a damp picnic blanket? Try this.
This is a great idea if you have a blanket that you don't want to *permanently* alter but would still like to use for grassy outings. You can waterproof a cotton or wool blanket by adding a protective backing of water-resistant fabric such as ripstop nylon or oilcloth, and safely lounge on damp grass.
Waterproof Blanket How-To
1. Cut fabric to the exact dimensions of the blanket, adding 1/2 inch on all sides for hem. Fold edges of backing under 1/2 inch, and place 2-inch-wide twill tape on top; machine-stitch both inside and outside edges of tape around entire perimeter, mitering tape at corners.
2. With a hammer or mallet, fix snaps along edges of the backing and the blanket (snap kits with instructions are available at sewing stores): Center a snap in the twill tape at each corner, then attach snaps at intervals of 10 to 12 inches around the whole border. Attach the "male" half of snaps to the backing first; then mark the placement of the "female" half of snaps carefully on blanket for a good fit, and attach snaps. The backing may be detached when it is not needed.
OR (my idea) if you didn't want to mess with the snap kit you could add a long piece of velcro while sewing the twill tape to the blanket (killing 2 birds with one stone). Just be sure to put the soft side of the velcro to the blanket and the rough side to the waterproof material so that you can reuse the blanket without any course obstructions.
Subscribe to:
Posts (Atom)

