Showing posts with label crafts. Show all posts

Pretty things for my car

Monday, April 21

When you learn to sew it is both a boon and a burden. Suddenly all those cute things you might have bought without any physical effort other than typing in your credit card number become 70% cheaper if you sew it yourself. Case in point- my previous car seat cover post. After looking at all those yummy fabrics I got jealous and dreamt of having one myself. The price was a little steep for me to sink a chunk of my very limited capital into, so I sifted through the simplicity stacks and found pattern 4636. Whatja think? Lily was so excited to sit in it she barely let me put on the final touches. I've been thinking about making one for Molly but I'll have to cut my own pattern for an infant version with hood. Now that I finally got my cigarette lighter fixed, the new seat will go nice with my new XM:) No more five year old Beyonce. Fred, Ethel and Lucy here I come.
Oh one more thing, the simplicity pattern came with a shopping cart cover. I might try that one next. If you have any questions about the pattern just send me a message or comment!

Martha Finds: Simple fixes for simple foibles

Friday, April 18

Got chocolate milk stains? Try this.

Okay, I didn't mean to get your hopes up if you thought I had some remedy for chocolate milk stains (insidious aren't they). But this is a neat way to cover them up.
Embellish a solid-colored shirt with bright butterflies in flight -- and conceal stains at the same time. Have your child choose the fabric; iron it to one side of fusible webbing. Trace the butterfly template onto the fusible-webbing side, and cut out. Remove paper backing, and iron the shape on top of the stain. Use several sizes and vary fabrics for a decorative effect or to cover multiple stains.
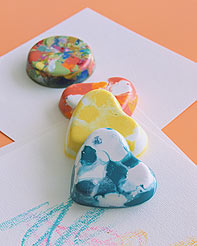

Got crayon crumbles? Try this!

This is such a fantastic idea! Not only do you use the last bits of crayon that were annoying you at the bottom of the crayon box BUT it can also be a fun activity for your kids. Encourage kids to come up with combinations: A blue-and-white blend for drawing the sky, for example, and a mix of reds and oranges for sunsets."

Tools and Materials
Kitchen knife
Old crayons
Mini-cake tins (we used pans with heart- and circle-shaped pockets)

Crayon How-To
1. Parents can use the knife to chop crayons into pea-size pieces, taking care to keep colors separate so kids can combine them as they like.

2. Preheat the oven to 150 degrees while children fill the tin with crayon pieces, arranging them in interesting designs.

3. Bake just until the waxes have melted, 15 to 20 minutes.

4. Remove the shapes after they have cooled. If they stick, place tray in the freezer for an hour, and the crayons will pop out.


Got a baggy dress? Try this.

I have this problem frequently- A beautiful print (often old navy) dress, no waist. I can usually sew a sash into the dress but if you aren't the seamstress type here's a great idea! A suede hole punched sash. This is great because you there's no fraying and if you buy a sturdier suede material it will hold its shape better. This belt lends itself to variation: Once you get the hang of it, you can even make it without the pattern.


Tools and Materials
1/8 yard of 60-inch-wide fabric|
Hole punch
Yardstick
Erasable fabric marker

Belt How-To
1. Fold fabric in half; place widest part of pattern at the fold. Pin in place with quilting pins, which are long and strong, ideal for heavy fabric like this.

2. Extend the straight lines of pattern to the bottom of the fabric with an erasable fabric marker and yardstick.

3. Cut out the belt. With the hole punch, perforate the edges, positioning holes 1/4 inch apart and 1/4 inch in from the edge.

4. Wrap belt around waist, and tie in back.


Got a damp picnic blanket? Try this.

This is a great idea if you have a blanket that you don't want to *permanently* alter but would still like to use for grassy outings. You can waterproof a cotton or wool blanket by adding a protective backing of water-resistant fabric such as ripstop nylon or oilcloth, and safely lounge on damp grass.

Waterproof Blanket How-To
1. Cut fabric to the exact dimensions of the blanket, adding 1/2 inch on all sides for hem. Fold edges of backing under 1/2 inch, and place 2-inch-wide twill tape on top; machine-stitch both inside and outside edges of tape around entire perimeter, mitering tape at corners.

2. With a hammer or mallet, fix snaps along edges of the backing and the blanket (snap kits with instructions are available at sewing stores): Center a snap in the twill tape at each corner, then attach snaps at intervals of 10 to 12 inches around the whole border. Attach the "male" half of snaps to the backing first; then mark the placement of the "female" half of snaps carefully on blanket for a good fit, and attach snaps. The backing may be detached when it is not needed.

OR (my idea) if you didn't want to mess with the snap kit you could add a long piece of velcro while sewing the twill tape to the blanket (killing 2 birds with one stone). Just be sure to put the soft side of the velcro to the blanket and the rough side to the waterproof material so that you can reuse the blanket without any course obstructions.

Now, they look *forward* to drying off!

Wednesday, April 9

Lily and her best friend Gracie (picture of the week April 5th) have matching hooded flower towels, store-bought from "The Children's Place". Her mother, my friend Abi, had the foresight to buy two so that neither little girl would want the other's. They were a HIT. Both Lily and Gracie love them. I liked the idea so much that I decided to make some of my own. I started out with lofty goals. I planned to make 6-7 for each girl. Well, that never happened but at least I didn't "throw in the towel" altogether. I did manage to make two a piece- a duck and a bunny (as well as a blue doggie for Gracie's brother). Not too bad. Dressing up never gets boring and better yet, it makes them look forward to drying off:)
(To right) Lily at her weekly swimming lesson, swimming with only ONE back floaty! I'm so proud.

If you want to make your own hooded towel just follow the instructions here. It's VERY simple. If you want to add some animal characteristics I included some inspirations below. The mermaids seem like a great idea although I've yet to attempt it. I hand-stitched most of the features (i.e. the eyes, dog nose and wiskers) with simple embroidery thread. For the duck bill I cut two hand towels in the shape of a bill and sewed them together then turned them inside out and hand-basted it to the hood.


Let's all go to the Carnival....down the hall.

Thursday, April 3

I like these. It gives you the opportunity to add pattern and color to a monotone kids room. And if your walls are already filled you can hang these from your windows. They look so sweet and whimsical.
Of course, I refuse to purchase them. Instead I'm going to attempt to do this on my own. I think it will be a FABULOUS way of using my discarded scraps! They look simple enough. But I'm sort of backlogged with projects so when I get around to it, I'll post my result.
If you're more practical. You can purchase them at Mahar Goods.

For the sewing impaired, make this tutu THREAD-FREE fast!

Friday, March 28

I feel like such a slug. I haven't posted in two days and I don't even want to look at my stat counter. I'm so sorry readers. My only excuse is that I'm in the middle of a project which will *eventually* post to this site. So in time, everything will come to fruition. At any rate, I'll be posting two ideas to make up for my lethargy.
First, for all you sewing machine challenged, here's an idea for creating a tutu- THREAD FREE!
You're going to need 2-8 yards of tulle, found in your local fabric store. Two yards will suffice for a children's tutu.

First, you're going to need to cut the tulle into strips. I cut my stripes about 4 inches wide - the width of these stripes is going to determine the poofiness, so use my tutu to judge.

After you have your strips cut, you're going to want to fasten them to a ribbon or elastic (see pic below) If you use ribbon, make sure it matches the tulle - or at least compliments it.

Just know that in the drawing below, you are actually looking at what will become the inside of the tutu's waist. You want the clean part of the loop on the outside.

You may want to play around with other methods of fastening the strips to the ribbon. Thanks to ambrosialove for this idea.

DSC02154

Simple frills for girly little girls

Sunday, March 23

Here's another *free* project for all the girly little girls who still love simple frills over Bratz and Hannah Montana. Printable *vintage* paper dolls. check these out: Vintage Paper Dolls

Custom Board Books all about....Your loved One

Thursday, March 20

I've noticed that within the past year the online market has been saturated with photobook companies, some better than others. Sifting through these sites I was disappointed to find that none of them had custom boardbook options. (Great for reading AND chewing) After a little researching, I came across two companies that will do this service for a reasonable price- My Custom Story and Lifetimez.com I've looked over these two companies and weighed their positives and negatives. In the end, it's a toss-up. Neither one has their own software for you to personalize your book- a benefit as you'd find with the larger hardback photobook companies. At this time, they both seem pretty small scale but I'm going to go out on a limb and predict that in a couple years, the options for custom boardbook companies will expand and in turn broaden options, pricing and sizes. I'm hoping that happens because I love the idea of custom boardbooks and be interested in taking advantage of a decent one.

I'll start with Lifetimez. Prices start at $34.95. This company has more size options (up to 8x8), better pre-designed layouts, and higher page limits (up to 40 front and back, 20 pages). However, its biggest downfall (in my creative opinon) is that you must use one of their pre-designed layouts. ALSO, it requires that you "subscribe" to their service. Although they say that starts at 8 cents a day, I could not find any details of the "actual" costs, so that's another negative. But they do have a 10-day free trial option that does not info. See examples below require your credit card:


The other option, My Custom Story, offers books with prices starting at $27.95. I'm not thrilled about their pre-designed storylines. The photos on their site are not professional and the layouts they use look like they've been made with Microsoft Word. In addition, their page limits top at 6 (12 pages front and back). And they only print one size 4x5. Their one redeeming quality- they allow you to customize your own pages. So if say, you had some upscale editing software like Photoshop or Illustrator you could create your own interesting layouts albeit with the above restrictions.

One more thing, there is an excellent site out there: Good Stock Press & Bindery. The top image is from their site. They will take your photos and turn them into a professionally designed, digitally printed, charming story, bound into a book the old fashioned way - by a skilled pair of hands. Of course, the caveat is their price. For a 7x7 pre-designed board book with complimentary matching spine, their prices start at $375! Wow, what a difference, huh. Not something I can take advantage of but worth mentioning none-the-less. See image to the left.

"Grimm" fairy tale

Monday, March 17

I recently came across an article posted in "The New York Times" featuring Walter Martin & Paloma Munoz. I first saw their work in "Aperature" magazine. Together, this couple creates unusual, three-dimensional worlds encapsulated in snow globes. Often darkly humorous, sometimes outright macabre, a polar combination of charming and ominous, these globes had me hooked. I HAD to have one. Of course, they are not for sale, even withstanding my lack of superfluous income, these little plums were just out of my reach. That is until I did a little online digging and found the tiny people were in fact miniature train figurines, Preiser to be exact, and the globes are sold at a couple online craft stores. My unique twist (for my daughter) is foreboding fairy tales scenes. My first attempt, shown below, the Pied Piper of Hamlin leading the children into the cave. Preiser has almost everything (including *nudists* and you guessed it, pied pipers) I even added a little lame boy trailing behind. I know some might dislike the idea of anything not dripped in icing or sanitized by Disney but I'd like lily to have the same literary backbone as I did. My mother read Grimm's Fairy Tales and The *real* Little Mermaid and didn't permanently scar me in the process. My next idea, Little Red Riding Hood walking through the forest with the wolf trailing behind her.

A soft loved one for your soft loved one

Thursday, March 13

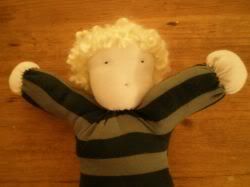
I'm going to finish the Martha Stewart handmade dolls I started in December. As things tend to go, I finished about half of them then ran out of momentum (ie lily's dollhouse consumed me). But it's time to start the ball rolling again. I finished the remaining heads but when I went to the MS site to print the bodies I discovered that the page no longer exists. So I posted the instructions and pattern from an old magazine in my basement for anyone who wanted to learn how to make them. Just click on the photo for the full-sized image and print. Do not blow the pattern to 238% as it says. (my finished ones are below)


My three-year-old won't let the long-blonde haired doll out of her sight. She takes her to restaurants, bed, car rides, etc....which gives me a special joy when seeing her bonding with it. My eight-month-old prefers the blond-curly haired doll but more for chewing than hugging. I would definitely recommend trying to make one for your little loved one.